

Migration to React SeriesMigration to React: Introduction
How to incrementally convert your AngularJS app to React


- Migration to React: Introduction
- Rendering React in AngularJS
- Calling AngularJS Services from React
- Multiple React Roots in AngularJS
With a date set for the end of AngularJS long-term support, it's been a wake up call for a lot companies still maintaining an AngularJS app. My team and I have been working on converting our large AngularJS app to React, and we've learned a ton along the way. Migrating to a JavaScript framework like React can seem like a daunting task, but it can be done, and I want to show you how we're tackling it to help you do the same.
Migrate or Rewrite?
While it is tempting, complete rewrites are a risky endeavor few can afford to make. Rewriting an app from scratch will make the migration problem go away, but in return it introduces code duplication and a much longer period before testing against real users in production. Delayed feedback on code rewritten in a new technology gives no confidence it was done correctly, which is an inherent risk in the approach.
On the other hand, an incremental migration allows individual pieces to get converted at a time, so each feature can reach production quickly, where it will be further tested at scale by real users. The feedback received from shipping earlier will drive further incremental improvements that will compound over time. Another advantage is that your team can pivot when new priorities arise. New features can be written in the existing app in the new technology, whereas with a rewrite, you may still be waiting a while for the rewritten app to reach feature parity before it can be released, or worse, have the new feature written in the old technology.
For small apps, a rewrite could be a feasible approach, but for large apps, an incremental migration is the way to go.
The Approach
To start out, take inventory on the screens in your app. Find simple forms, screens with very little logic, or just areas that display information. These are the best candidates for converting to React.
Our first conversion was our change password screen. It included just a few inputs and some basic validation, and it wasn't a heavily trafficked area of our application. Converting a highly-used piece of functionality introduces more risk, so it's better to start out with the features off the beaten path. Save the others for when your team has had some success.
Principles to Keep in Mind
Thinking about your app as a tree structure, we want to start at
the leaves and work upward.
In other words, AngularJS renders React, not the other way around.
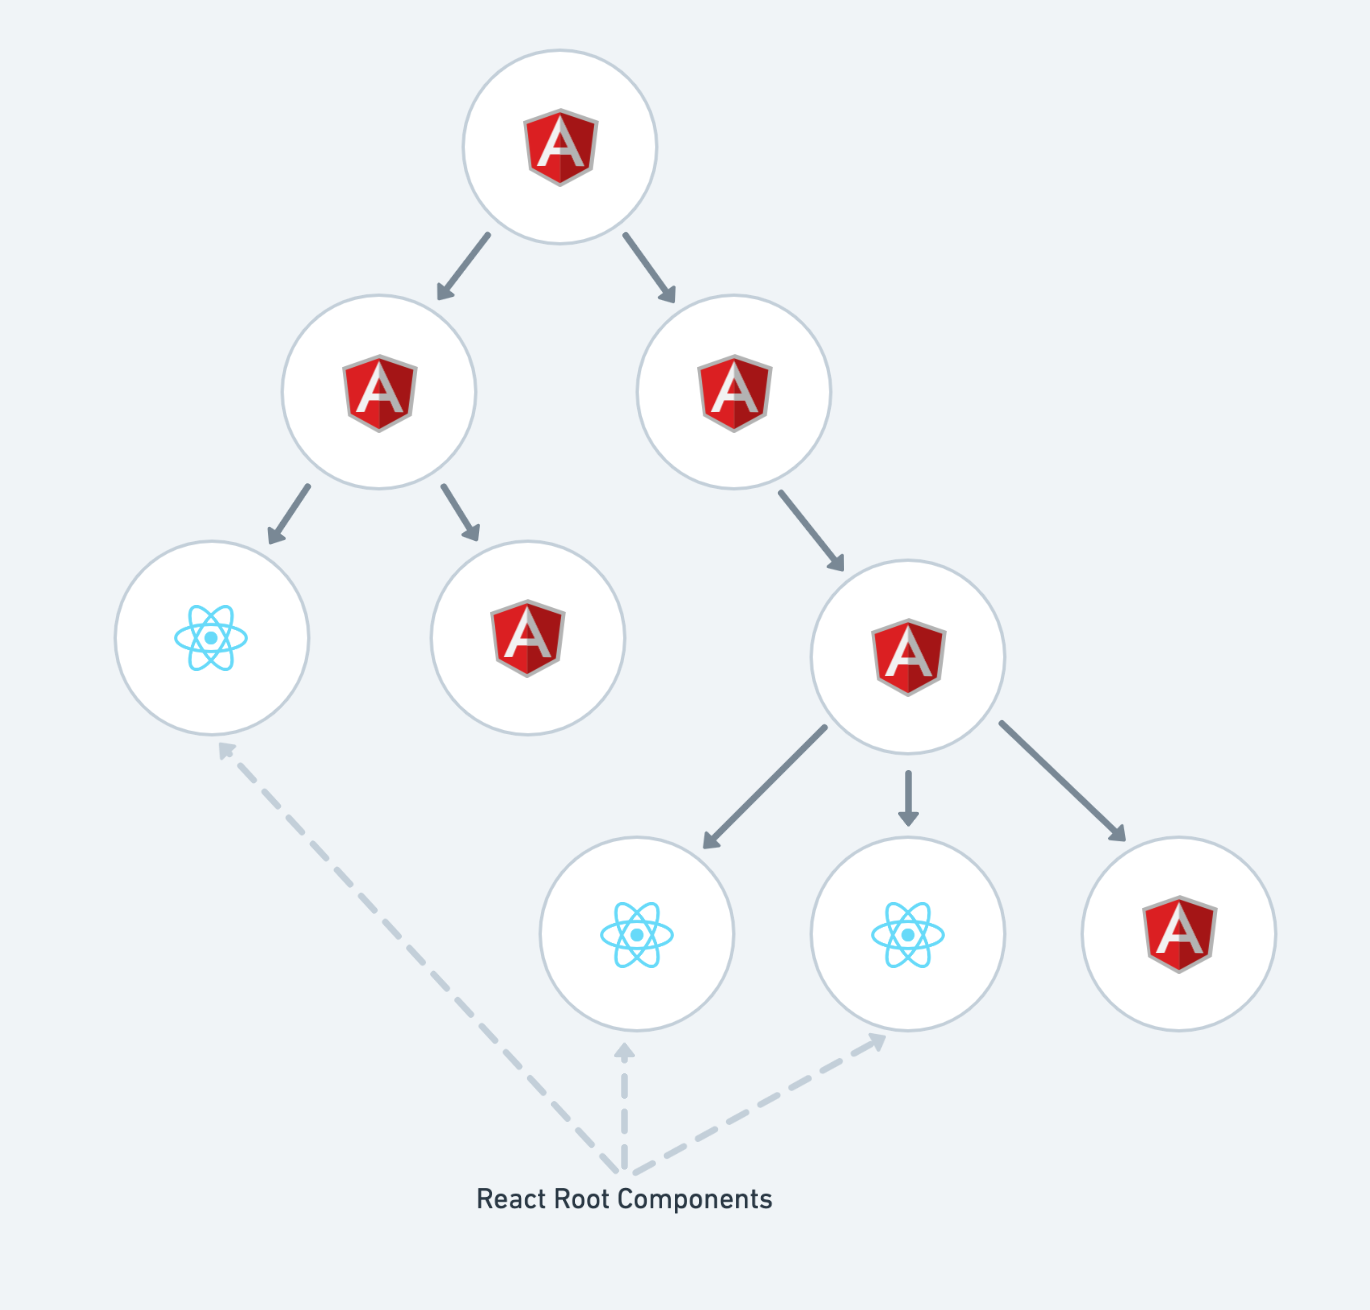 An AngularJS app with some components converted to React
When it comes to forms, it's best to convert the whole thing at
once.
While I'm sure it's possible to make React input controls work
inside the AngularJS form framework, the question is should we?
Having such granularity of control is going to make it difficult to
know what should be converted in particular situations, which leads
to my next point.
Integration code is throw-away code, so the less we have to write,
the better.
From my previous example, the time spent trying to figure out how to
use a custom React input component in an AngularJS form and have it
do all the things AngularJS expects (dirty the form when it changes,
change the value, validate it, etc.) could have been used to convert
the whole form and be done with it.
Another thing to avoid is creating React versions of existing AngularJS services and writing code to keep them in sync. Global state should be held by AngularJS because it still owns the overall app. Writing a duplicate service in React and syncing them up is unnecessary and will likely end up with some strange bugs. Just keep it simple.
Routing
One of the biggest challenges of the migration involves the router. It acts as the spine of the front end because all components get rendered under a route definition. We can convert an AngularJS template under a route to React, but the route definition in the AngularJS code has to remain.
This is definitely a problem though. Imagine you've converted every route template to React. What's next? Should you convert all the route definitions at once? If there aren't many, that's fine, but for a large app, that would be a nightmare.
The solution we came up with was to make the AngularJS and React routers co-exist on the same page. This allowed us to move routing into the React code over time.
The route definitions begin with rendering only AngularJS components.
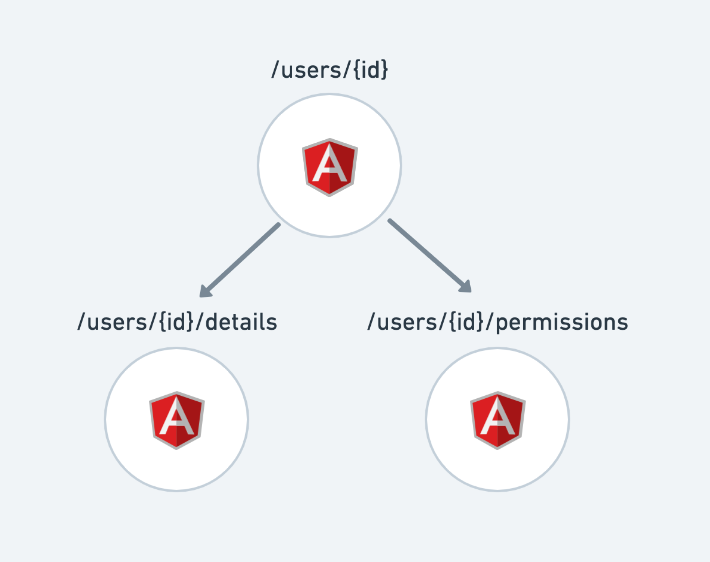
The first route is converted to React.
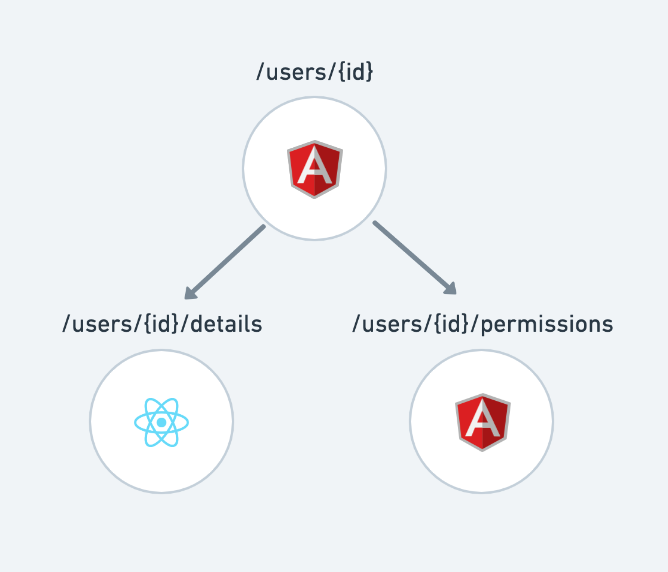
Then the second route is converted.

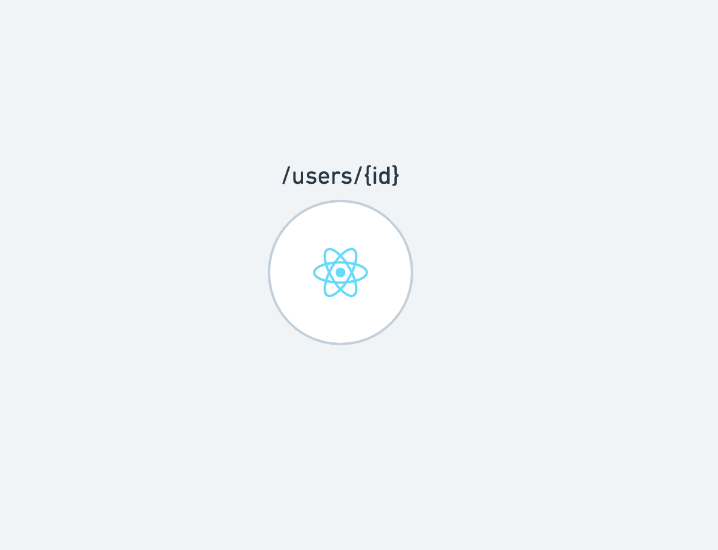
And now the route definitions for /details and /permissions can
be moved into a single React component that handles all routes under
/users/{id}.
Preparing the Codebase
The first thing that needs to be done to begin migrating from AngularJS to React is to update your front end build to use Babel and Webpack (or some other modern bundler). When we were starting to talk about our migration to React, we were still using Gulp, so our first step was to migrate our repositories to Webpack, one at a time.
Where will the code live?
One of the first decisions that you have to make is where your new React code will go. If your app is all in a single repository, then it makes sense to just have the React code alongside the AngularJS code. However, if your app has modules with their own repositories, you might opt to create a new repository (or repositories) with your React setup.
Supporting JSX
To be able to handle JSX and all the JavaScript features typically
used with a React app, I recommend the babel-preset-react-app
package. It's what Create React App uses, so it's the easiest way to
get all the syntax support you need for React development.
Just add the preset to your Babel config, and you're on your way.
{
  "presets": ["react-app"]
}
Setting Up the Test Runner
Depending on where your React code will be, the test runner may not be a problem at all. If the React code is in its own repository, that makes it easy; just configure Jest in your new repository. But if it's side-by-side with AngularJS, there's a little bit of work to do.
One way to handle having Jest (for React) and Karma (for AngularJS)
in the same repository is to have separate suffixes on the files.
For example, if you're currently using .spec.js for your AngularJS
tests, you could use .test.js for React. You'll just have to make
sure that each test runner is only looking for its designated
suffix.
In Summary
- When it comes to large apps, an incremental migration to React is the way to go.
- Keep things simple by converting the easy components first.
- Use
babel-preset-react-appto configure your codebase for React development. - Keep your React code in a separate repository or use file suffixes to help your React and Angular test runners target the appropriate tests.