Within Reach: Testing Lists with React Testing Library
How the `within` function makes testing lists simple
When it comes to targeting elements with React Testing Library, it's easy when there's only one. Throw in a getByText or getByRole, and you're off to the races.
Have a list of something? Then you get hit with this:
Found multiple elements with the text of: ${text}You now have some more decisions to make.
Let's get into some examples of how to test your component that's rendering a list of elements.
The Component Under Test
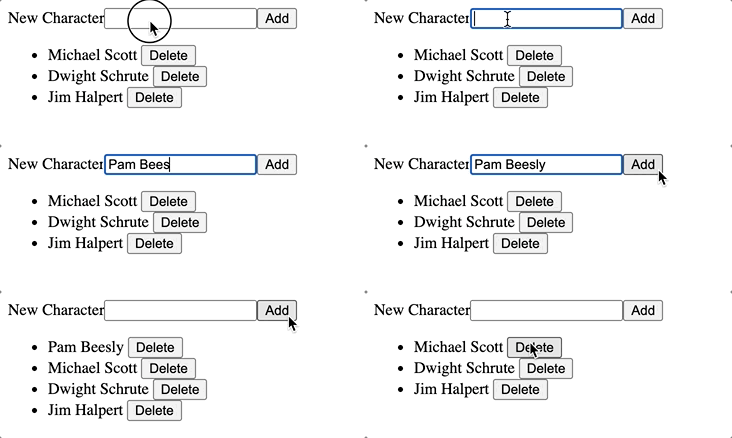
For demonstrating these concepts, we're going to be testing a simple component that manages a list of characters from The Office.
It only does a few things:
- shows a list of characters
- adds characters to the front of the list
- deletes characters

function OfficeCharacters() {
  const [characters, setCharacters] = useState([
    'Michael Scott',
    'Dwight Schrute',
    'Jim Halpert'
  ]);
  const [newCharacter, setNewCharacter] = useState('');

  function add(e) {
    e.preventDefault();

    setCharacters((prev) => [newCharacter, ...prev]);
    setNewCharacter('');
  }

  function deleteCharacter(character) {
    setCharacters(
      (prev) => prev.filter((c) => c !== character)
    );
  }

  return (
    <>
      <form onSubmit={add}>
        <label htmlFor="newCharacter">New Character</label>
        <input
          type="text"
          id="newCharacter"
          value={newCharacter}
          onChange={(e) => setNewCharacter(e.target.value)}
        />
        <button>Add</button>
      </form>
      <ul>
        {characters.map((character, i) => (
          <li key={i} data-testid="character">
            <span data-testid="name">{character}</span>{' '}
            <button
              type="button"
              onClick={() => deleteCharacter(character)}
            >
              Delete
            </button>
          </li>
        ))}
      </ul>
    </>
  );
}
Setting Up the Test Render Function
The testing pattern I'm a big fan of involves setting up a test render function (read more about it in Solving the Maintenance Nightmare). In short, it abstracts the element-targeting logic and keeps the individual tests focused on the scenarios.
Beginning with the Form
The form part of the component will be the easy part. Here's what we have:
<form onSubmit={add}>
  <label htmlFor="newCharacter">New Character</label>
  <input
    type="text"
    id="newCharacter"
    value={newCharacter}
    onChange={(e) => setNewCharacter(e.target.value)}
  />
  <button>Add</button>
</form>
Let's create our test render function and add those elements to the return.
describe("OfficeCharacters", () => {
  function renderOfficeCharacters() {
    render(<OfficeCharacters />);

    return {
      newCharacterInput:
        screen.getByLabelText('New Character'),
      addButton: screen.getByText('Add'),
    };
  }
});
Querying the List with within
For the next part, we tackle the list.
<ul>
  {characters.map((character, i) => (
    <li key={i} data-testid="character">
      <span data-testid="name">{character}</span>{' '}
      <button
        type="button"
        onClick={() => deleteCharacter(character)}
      >
        Delete
      </button>
    </li>
  ))}
</ul>
Now, we could use a getAllBy* query to get all the names and then another query to get all the delete buttons. But then we'd have to stitch them back together based on index. Yeah... Let's not do that.
Instead, let's use a handy function from React Testing Library called within.
We can use it to query within a container. There's a variety of ways we could specify the container for each list item, but I like to use a data-testid to signal that it's only needed for testing.
<li key={i} data-testid="character">
  ...
</li>
In our test render function, we can now loop over the elements with data-testid="character" and get the name and delete button for each one.
return {
  newCharacterInput: screen.getByLabelText('New Character'),
  addButton: screen.getByText('Add'),
  getCharacters() {
    return screen.getAllByTestId('character')
      .map((item) => ({
        name: within(item)
          .getByTestId('name')
          .textContent,
        deleteButton: within(item)
          .getByText('Delete')
      }));
  }
};
Testing Add
When testing add (or anything really), we need to first verify the initial state is what we expect. If we assume something is or isn't there and eventually that changes, we could end up getting a false positive.
With the test render function in place, everything else becomes straight-forward because we don't have any query logic directly in the test.
it('should add a character', () => {
  const {
    newCharacterInput,
    addButton,
    getCharacters
  } = renderOfficeCharacters();

  const pam = 'Pam Beesly';

  // verify pam is NOT in the initial list
  expect(
    getCharacters().find(
      (character) => character.name === pam
    )
  ).toBeFalsy();

  // add pam
  fireEvent.change(
    newCharacterInput,
    { target: { value: pam } }
  );
  fireEvent.click(addButton);

  // verify pam is first in the list
  expect(
    getCharacters().findIndex(
      (character) => character.name === pam
    )
  ).toBe(0);
});
Testing Delete
For delete, we just get the delete button for a particular character, click it, verify the character is no longer there, and we're done!
it('should delete a character', () => {
  const { getCharacters } = renderOfficeCharacters();

  const jim = 'Jim Halpert';

  // get the delete button for Jim
  const deleteJim = getCharacters().find(
    (character) => character.name === jim
  ).deleteButton;

  // delete Jim
  fireEvent.click(deleteJim);

  // verify Jim is NOT in list
  expect(
    getCharacters().find(
      (character) => character.name === jim
    )
  ).toBeFalsy();
});
Here's the CodeSandbox to view the full solution:
Summary
- For testing lists, put a
data-testidon the repeating container, and usewithinto query the individual elements. - All of your tests can make assertions off of the array property returned from the test render function.


